Using messages
The message system provides a way to notify about events and to exchange information.
Messages and arguments
MessageArguments is the base class for arguments passed in messages. Kanzi provides built-in message types for different nodes and triggers. For example, the ButtonConcept::ClickedMessageArguments message for the Button: Click trigger and the Page::ActivatedMessageArguments message for the Page Activated trigger.
You can extend the MessageArguments class by writing your own message types.
Message type describes:
- The nature of an event or information
For example,ClickManipulator::ClickMessageandListBoxConcept::ItemSelectedMessage. - Arguments to describe the data associated within the message
For example, the HitTestPointProperty and SelectedItemIndexProperty properties.
You can describe and access the message arguments with the PropertyType objects. MessageArguments::setArgument function sets and MessageArguments::getArgument function retrieves arguments with the underlying storage type for arguments, such as float, Boolean, and Vector3.
Dispatching messages
To dispatch messages to the handlers, use Node::dispatchMessage. This function defines the message type and arguments, and calls all the handlers which are registered for the node for that message type.
Node::dispatchMessage notifies the handlers immediately before the function call returns, which enables the handlers to react to the message immediately.
Receiving messages
All messages in Kanzi are routed messages. When a message is dispatched the system walks through the scene graph from the root node to the target of the message in a process called tunnelling and then walks back in a process called bubbling. At each passed node in the scene graph the system looks for handlers for the dispatched message. This allows you to install handlers at any place in the scene graph to intercept messages before they reach their destination, or to gather messages from several sources.
Handle messages during bubbling phase, and intercept or filter messages during the tunnelling phase.
Receivers are implemented as functions and passed as pointers to Node::addMessageHandler() and kzuMessageDispatcherAddTunnellingHandler(). To provide context to the receiver implementation, provide a pointer to the user data at registration time. Use Node::removeMessageHandler() to remove handlers.
Timers
The message system has inbuilt support for timers, accessible using KzuMessageDispatcher. kzuMessageDispatcherAddTimerHandler() subscribes and kzuMessageDispatcherRemoveTimerHandler() unsubscribes a timer. During subscription set the interval for the timer and the timer behavior:
- Once calls the handler once when the time specified in the interval passes.
- Repeat calls the handler repeatedly for each interval that passes.
- Batch calls the handler only once during a frame batching all timer messages together.
Creating custom messages in Kanzi Studio
To create a custom message in Kanzi Studio:
- In the Library press Alt and right-click Property Types and select Property Type.
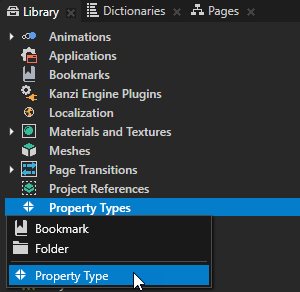
The Property Type Editor opens. - In the Property Type Editor set:
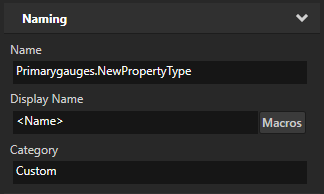
- In the Naming category set:
- Name to set the name for the property when you use it in the Kanzi API.
Property type names cannot contain:- A period (.) in the beginning or at the end of a property name
- Spaces
- Tabs
- Slashes (/)
- Backslashes (\)
- Hashes (#)
- Opening or closing braces ({})
- At signs (@)
- Display Name to set the name for the property when you use it in Kanzi Studio. Enter <Name> to use the same name as the one you set in the Name property.
- Category to set in which category Kanzi Studio shows your property type in the Properties and Add Properties windows.
Use the Category property to quickly find your property types in Kanzi Studio.
- Name to set the name for the property when you use it in the Kanzi API.
- Use the Data Type property to set what kind of data it holds. To create a message set Data Type to Message.
- In the Type Specific section set:
- Arguments accepted by the message
- Routing Mode used by the message
- In the Naming category set:
- Click Save.
You can now use this custom message in your application.
See Setting the handling of trigger messages.
